Saturday 21 September 2013

Starting afresh, and something sweet and seasonal

Yep. I was right. What I said here, and then some. Life, unfortunately, has had the better of me for months now, and I am only getting the energy to blog now. A quick recap before getting on to more important stuff. Wedding in Belgrade, days in beautiful Vienna, a broken heart but the perfect break-up, a birthday, Scotland having a hot summer, climbing bonanza here, lazy days in Sweden, back for the Fringe, a job interview, a job offer, another weekend in Stockholm, back for an appointment with a solicitor. And here we are, 21 September and I have worked my last day amongst the mathematicians and on Monday I shall take on the social scientists of Scotland instead. I am no longer a house owner. I am happy.

I have a recipe I'm working on, and a bit of a tirade on how a perfect dough feels clammy, but I need to test the recipe a bit further before letting it loose on the internet. In the meantime I thought I'd share a seasonal recipe instead. We are really coming into apple season in the UK and I, for one, intend to make the most of this. I baked this subtly apple-flavoured loaf last week and my (as of two days ago) former colleagues were asking for the recipe.

This post is dedicated to the bunch of people I have worked with for the last five years. Thank you for the laughs and tears, for your support and for your cheese scones. You rock.

Apple loaf. Photo: Helene Frössling


A sweet apple loaf

100 g butter (at room temperature)
200 g granulated or caster sugar
2 medium eggs
175 g plain flour
1.5 tsp baking powder
1 tsp ground cinnamon, plus a bit more for dusting
1/2 tsp vanilla essence
100 ml apple juice (not from concentrate)
1 large organic apple
"Pearl sugar"

Turn the oven to 170 degrees. Line a loaf tin with baking paper.

In a large bowl and using a hand-held electric whisk, cream the butter for a minute or so, then add the sugar and continue creaming for a couple of minutes until fluffy. In a smaller bowl mix the flour and baking powder with the cinnamon. Into the butter and sugar mix, add the eggs one at a time, incorporating the first one fully before adding the next one. If the mixture separates, add a spoonful of the flour after each egg. Swap from the electric whisk to a spatula. Mix the apple juice with the vanilla essence in a small bowl or measuring jug. Into the main mix add a third of the flour stirring it in fully, then half the apple juice, stirring again. Repeat the addition of flour, then the last of the apple juice, then the last of the flour. Finally, stir in the grated apple. Spoon the mix into the loaf tin, smoothing it down fully, and then across the top dust some cinnamon and, if you have any pearl sugar sprinkle some of that over the cinnamon. If you don't have pearl sugar, perhaps try demerara sugar?

Bake on the middle shelf for 35-40 min or until an inserted skewer comes out clean. Leave to cool somewhat in the tin before taking it out and letting it cool fully on a plate. It'll have a lovely toffee-ish smell.

Friday 10 May 2013

A long time since last, and granola revisited

Apologies. I've not been good at updating. I guess blogging regularly is a skill, and a time-consuming one at that.

It has been a very busy spring. There have been travels, and weddings, and planning for more travels, and spending time with family, and meeting with friends, and making new friends. There have been windy days, and still days (though not many). There hasn't been many sunny days, come to think of it. But those which we have had have been cherished and enjoyed.

When I am busy I don't tend to experiment with new recipes. Well, actually, I do, but they aren't recipes for sharing. They are concoctions, they are the results of emptying the vegetable drawer in the fridge or doing the supermarket shop late at night when foods are reduced down to nothing. They are a way to unwind my mind and to nourish myself. But they are not recipes to be shared. When things really get busy, it is time to revisit old friends. By that I mean the recipes that are so deeply ingrained in you that you could cook them while asleep.

The latest of my trips was to London for the Early May bank holiday weekend. My boyfriend is spending a couple of months in Vienna for work, and we had decided to meet up in London (where he used to live) to get to spend some time together, and for me to meet some of his close friends. It was a great weekend. At quite a late hour on Sunday, in a pub in Stockwell while attending a brilliant club night, I ended up in conversation with some of the crowd about granola. I extolled on the virtues of making your own granola (hopefully not to the extent of leaving these people with an impression of their mate's newish girlfriend being a bit loopy), and it struck me that the recipe I was talking about was not the one I had posted on the blog previously. You see, after the previous granola post I re-visited the recipe since a friend mentioned using apple juice instead of honey. Delicious magazine had written on the topic. It didn't take much experimentation to tweak it a bit to my liking. I made notes about how this granola was made, then ran out of time to post it between the travels, and weddings, and travel planning, and family time and all that. Lo and behold - when I return from the weekend in London I find my granola notes on my desk at work. Sometimes it's a really good things that we don't have a clean desk policy here.. So, this recipe really is for my boyfriend's friends in London, although everyone should try it. Give it a go, it's easy!

Breakfast: yoghurt, granola, fruit. Photo: Helene Frössling


Lean, mean granola

350 g jumbo oats
200 g seeds (sunflower, pumpkin, hemp, linseed..)
150 g nuts (walnuts, hazelnuts, macadamias, pecans, pistachios..), chopped into smaller pieces

200 g dried fruits (raisins, sultanas, cranberries, chopped dried figs...)

150 ml apple juice
90 ml maple syrup
1 tsp vanilla extract
1/2 tsp ground cinnamon

Preheat your oven to 140 degrees, and line two or three baking trays with baking paper. Use baking trays with rims - baking sheets without rims are likely to cause a headache.

In a large bowl mix the oats, seeds and chopped nuts. In a small saucepan, gently heat the apple juice with the maple syrup, vanilla and cinnamon. The cinnamon will most likely start off coating the surface but you want to do your best to stir it in. You are only looking to heat it a bit, to enable the ingredients to mix. Fold the warm liquid into the oat, nut and seeds mixture, trying to gently coat all of it without mashing anything. Spread the granola over the lined baking trays and put these in the pre-heated oven. To toast the granola will take around 40 minutes, but you should ideally gently turn the granola every 10 minutes or so, and perhaps shift the trays around as well. Once the granola is golden, remove the trays from the oven and combine onto one tray, then scatter the fruit over the still-hot granola. Allow to cool on the tray before storing in an airtight container.

A note of advice - this can become fairly expensive to make if you buy the nuts, seeds and fruits at full prices. I always keep an eye out for special offers so I can keep a stock of these supplies in the house. 

Monday 18 March 2013

A new tool, and a brunch bruschetta

Do you remember those novelty t-shirts that were common before low-cost carriers carried us all everywhere all the time? Before social media gave a platform for holiday bragging? Back in those days our method for showing off about our travels was the print "My [insert relation] went to [insert geographic location, preferably mainstream] and all I got was this lousy t-shirt". Well, how's this one for a real-life retro-but-modern feel: my boyfriend went to San Francisco and came home bearing me a brand new iPad mini. Total and utter surprise on my part, I can tell you! And this is my first attempt to blog on it.

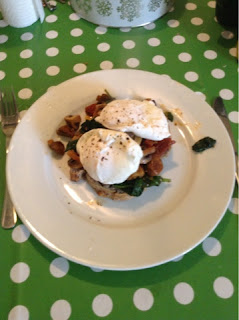
Since my boyfriend and I only had one weekend together in March due to travels aplenty, we spent most of it together. We are both big fans of breakfast in general, and at the weekend especially a cooked one. Yesterday I came up with a new recipe for his unsuspecting taste buds to wrap themselves around. As in my habit it was constructed out of what happened to be in my fridge: mushrooms, spinach, eggs, chorizo. In some ways it is a variation on classic cooked British breakfasts, but simultaneously it has continental vibes. I think of it as a breakfast bruschetta.


Breakfast bruschetta for two hungry people

250 g chestnut mushrooms
60 g chorizo (air dried)
100 g fresh spinach
2 ripe tomatoes
4 fresh welfare eggs
4 slices of bread

Clean the mushrooms and quarter them. Cut the chorizo into little cubes. Heat a large frying pan and add the mushrooms. Keep the pan on a hot flame for a couple of minutes, then turn down the heat and add the chorizo. Cook for another couple of minutes, until the chorizo is cooked. Cut the tomatoes into quarters, and add them for a minute or two. Add the spinach leaves and cover with a lid for a couple of minutes until the spinach has wilted. Season if you think it's necessary; I find that it's not needed.

Meanwhile, poach the eggs. If you've never done this, don't be scared! Boil 4-5 cm of water in a wide saucepan, then add a teaspoon or two of white wine vinegar. Crack the eggs one by one into the water, which should be almost at boiling temperature. I find it easier to crack the eggs in advance into separate small bowls, then tip them in. Leave the eggs in the simmering water for around 3 minutes - longer if the eggs are larger or if you prefer them more cooked. Remove the eggs with a suitable tool, like a slotted spoon, onto a warm plate covered in kitchen roll to drain off water.

Toast the bread. To serve, place two slices of toasted bread per plate, ladle over the mushroom-spinach-chorizo-tomato mix and top with two poached eggs. Some cracked black pepper on top works well.


Sunday 10 March 2013

Addicted to beetroot, and beetroot, orange and chocolate muffins

Three or maybe four years ago I tried the amazing combination of chocolate and beetroot for the first time. I have long been a fan of beetroot in most of its incarnations; it is only the cruelest of pickling that I don’t like. Think beetroot carpaccio, think tender wee beetroots roasted and served with butter, think beetroot hummous. The same year, 2009 (or was it 2010?), I saw a recipe for beetroot cake in the comments thread of some article on the Guardian website. I was intrigued and had to try it, turning the recipe into muffins instead. Those muffins were brought to work, perhaps in an attempt to get some feedback or more likely to avoid eating them all myself. My colleague J was so taken with them that she considered asking me to make her a beetroot chocolate wedding cake.

Just before Christmas I heard of a newly started, small artisan chocolatier in Edinburgh called Edward&Irwyn. It was small, and to the outside world it was not much more than a blog. On the last evening I spent with my boyfriend before we both left for our respective family Christmases, he gave me some of the E&I chocolates. One of the two flavours was beetroot, orange and milk chocolate. It was, quite simply, divine.

With J’s return to work after maternity leave (not an easy return due to nursery bugs galore, I must add), and the delicious E&I chocolate in mind, I decided to try to bake something like the muffins I had made before, but denser and moister. If you’ve read other posts of mine recently you might also recall an obsession with a certain recipe by Dan Lepard, so using oil rather than butter was an easy choice. I didn’t have to experiment more than once to find the right mixture. 


Beetroot, orange, chocolate. Photo: Helene Frossling


Chocolate beetroot orange muffins


3 eggs
80 g caster sugar
80 g golden syrup
120 ml vegetable oil
250 g cooked beetroot
zest from one-two oranges
120 g plain flour
60 g cocoa powder (not sweetened!)
1 tsp baking powder

Start by switching on the oven to 180 C, and getting out a 12-hole muffin-tray, and line with cupcake cases. I find metal muffins trays far easier than silicone ones, but we all have different preferences.

Finely grate the cooked beetroot and zest the oranges. In a small bowl mix the plain flour, cocoa powder and baking powder.

In a larger bowl and using a hand-helg electric whisk, mix eggs, sugar and golden syrup until light and a bit fluffy. Mix in the vegetable oil. At this point switch from the electric mixer to a spatula; the rest you want to do with a bit more finesse. Gently fold in the beetroot and orange zest. Once mixed well, fold in the flour mix. Divide between the cupcake cases. The mix will only rise a little bit when baking.

Bake the cupcakes for 20-25 minutes. Let them cool before eating, and eat within a couple of days if you want them at their freshest. I have no idea how long they stay ok, but I think most people wouldn’t find out as the muffins would be long eaten before they go stale. If you want to frost them to make them more like cupcakes I recommend the Hummingbird Bakery Cream Cheese Frosting. If you donb't have their books, Ocado has the recipe. 


Sunday 17 February 2013

Something for the weekend: mango and lime loaf


Ever since The Guardian published the Dan Lepard recipe for olive oil cake I have been a woman somewhat obsessed with exploring the possibilities of this dairy-free cake. It have tried it with orange and cinnamon, with walnuts and coffee, with Earl Grey tea and lemon, with just mixed spice. I find the recipe incredibly versatile and as far as cakes go it is also towards the less unhealthy end of the spectrum. Please do note that I’m not trying to make this into something healthy. It’s just somewhat less bad for you than some other cakes.

In a lot of my cooking endeavours I am steered by what I happen to have in the house. This time it was a mango so ripe that it practically begged on its somewhat wrinkly knees to be used up. Next to it perched a lime whose zest had started to dry just a little. My trusted guide to many matters culinary, The Flavour Thesaurus by Niki Segnit, did remind me of the magic potency of mixing mango and lime. In light of that, it simply had to be done. The result is a moist cake with a very mild flavour and a tiny bit of crunch to the top.

Mango and lime loaf. Photo: Helene Frossling

Mango and lime loaf

1 VERY ripe mango
1 lime
135g light muscovado
4 large free range eggs
150 ml vegetable oil
200g wholemeal spelt flour
1.5 tsp baking powder

Pre-heat your oven to 180C. Grease a loaf tin and line it with baking paper.

Peel the mango, and chop the flesh into small pieces. Zest the lime, then squeeze out the juice. Using a hand blender or a food processor pulp the mango with the zest and a tablespoon of lime juice. 

In a large bowl and using an electric hand mixer (or, if you feel strong, just a whisk), whisk up the eggs and the sugar. You are looking for a frothy mixture which is lighter in colour than what you started with – 2-3 minutes with the electric mixer should do it. If you are feeling strong and going for it with a whisk, you’re looking at far longer; just focus on the cake and the bulging biceps to come. Mix in the oil, followed by the mashed-up mango.

In a small bowl mix the spelt flour and the baking powder well. Gently fold this into the egg mixture, trying to loose as little air as possible.

Pour the mixture into the loaf tin. Bake in the pre-heated oven for around 50 minutes or until a skewer inserted into the cake comes out clean. Allow to cool in the tin before lifting out. Store wrapped in greaseproof paper in a tin or tupperware box. Stored like this it will keep well for a couple of days, although my boyfriend would probaly let it stretch to a slice per day for up to a week - or until I have to try out the Lepard recipe again.  


Shakshuka, or something like it


The good thing about following food blogs, reading cookery books and watching chefs prance around on TV is inspiration. Having quite a good memory (albeit increasingly unreliably as I dive deeper into my thirties) I can often recall interesting ideas picked up from all these recipes I come across. I don’t tend to spend money on buying the associated books – it is just their ideas I am after. As a cook I tend to be quite bold – to make things up as I go along. This comes in quite handy since I have a tendency of cooking using the ingredients at hand rather than buying ingredients for a specific recipe.

Shakshuka came to me in this way. I vaguely recalled seeing the dish raved about by Yotam Ottolenghi in his Mediterranean Feast series on Channel 4. I also stumbled upon Hemsley and Hemsley’s take on it, “Anytime Eggs”. I always have eggs, tomatoes, onions and garlic in the house, and quite often some greens as well. Cumin and smoked paprika are my staple spices, as will be very clear in this blog. Over a few weekends I ended up trying out different ways of preparing it and have ended up with a dish that is the perfect weekend pick-me-up. By no means of the imagination should this be seen as an authentic version of the dish. I do think anyone who tries it wants to have it again.

The greedy cook/photographer didn't get a chance to snap until  it was almost too late. Photo: Helene Frossling


Perfect breakfast for one VERY hungry person

1-2 tsp olive oil
1 banana shallot, or a couple of smaller shallots
1 garlic clove
4 ripe tomatoes, chopped
1 tsp balsamic vinegar
1 tsp ground cumin
60 g spinach, washed
2 free range eggs

To serve:
Smoked paprika powder, plain yoghurt, fresh dill or mint (chopped), bread.

Peel and slice the shallots thinly. In a small frying pan (approx 20 cm across) heat the olive oil and fry the shallots on a gentle heat until cooked through and beginning to get some colour. Crush the garlic and add to the pan for half a minute before adding the chopped tomatoes, the balsamic, the cumin and a tablespoon or two of water. Cook on a gentle heat until it looks like a somewhat dry tomato sauce. Add the spinach and put a lid on to let the spinach wilt into the mixture for a couple of minutes. Stir and season.  Now make two wells in the tomato and spinach mixture, large enough to hold an egg each. Crack one of the eggs into a cup, remove any errant pieces of shell then tip the egg into one of the wells in the frying pan. Repeat with the second egg. Put a lid on the pan and leave it until the egg white has set, which takes around 5 minutes.

To serve, dollop some yoghurt over the top, scatter with some paprika powder and chopped fresh herbs. Eat straight from the pan using a fork and pieces of bread. Amazing.   


Saturday 16 February 2013

The importance of breakfast, and my homemade granola


I have always been a greedy girl. Those with the patience to follow this blog as its identity becomes clearer will probably quickly realise that food is something I love with a passion. Eating, cooking, sharing; even (annoyingly) at times photographing. Ever since I was a baby I have had fast metabolism and I tend to wake up ravenous. How lucky for me that I grew up in a country where the phrase “breakfast is the most important meal of the day!” was almost as ever present as the Jante Law and Carola.

Breakfast can take many shapes. Some days are perfect for eggs. Perhaps they will be scrambled slowly and served with smoked salmon and chewy bagels. Or there may be poached eggs perched on a bed of fried chanterelle mushrooms (foraged in the forest behind my childhood home) on a toasted thick slice of sourdough bread.

Other days are grain days; the days when bread take centre stage, or when the humble oat shall rock your boat. In the Swedish way I do like my bread in the morning to be more towards an open sandwich than a slice of toast. In the household I grew up in, toast was for those days when the fresh bread had gone a bit stale and was beyond recovery. Fresh bread was eaten with cheese, ham, salad vegetables such as slices cucumber or red pepper. And oats. Oats often end up in porridge; the thick warming mixture made with half and half milk and water, and topped with fresh fruits and seeds. But some mornings there simply isn’t enough time to make porridge, or there isn’t even stale bread to be found for some toast. On those mornings it is good to have made some granola.

I started making granola a couple of years ago, according to a recipe by Yotam Ottolenghi in his first (and eponymous) cookbook. These days I make my own mixture, loosely based on the original recipe but creating a crunchy, nutty, seedy and fruity mix just to my taste. It is divine with cold milk or creamy yoghurt. It is vital to go for jumbo oats here, as porridge oats will disintegrate in the process.

My biscuit tin of homemade granola. Photo: Helene Frossling


Granola

300 g of jumbo rolled oats
150 g chopped nuts of your choice; I like walnuts, almonds and pistachios
150 g seeds of your choice; pumpkin, sunflower, linseed
100 ml of clear honey
100 ml of maple syrup
4 tbsp of oil; I find olive oil too strong so like to go with rapeseed or sunflower oil
3 tbsp water
pinch of salt
250 g dried fruits of your choice; I tend to do raisins, sultanas and figs – the latter cut into small pieces

Preheat your oven to 150 C. Line two or three oven trays with baking paper.

In a bowl mix the oats with chopped nuts. As a guideline to chopping the nuts – just think of how big chunks you would like to eat in your breakfast. Add the seeds.

In a small saucepan gently heat the honey, maple syrup, oil, water and salt until the honey has melted and all is combined. Pour over the oats and stir carefully to mix everything but without breaking up the oats too much. Divide between the baking trays. Bake in the preheated oven for around 40 minutes, gently turning the oats on the trays every ten minutes and also swapping the trays around between shelves. It might seem like a hassle but you want to ensure as even a bake as possible.

When the oats are a golden colour remove from the oven and allow to cool for a few minutes before moving all the granola mix onto either one of the trays or a clean roasting tray. While the mix is still very warm, scatted the fruits on top and mix up.

Once the granola is fully cooled down transfer to storage jars. I like to keep my granola in a biscuit tin lined with baking paper; I like to be able to scoop the granola from there into my bowl. The granola keeps for quite a while but is best eaten within 2 weeks. However, it is so tasty that I doubt anyone can keep it that long..